Facebook Ad Manager: A Complete Step-by-Step Guide for Beginners
If you are just starting with Facebook ads and feel overwhelmed by the numerous buttons, metrics, and settings within Ads Manager, you are not alone. This is Meta’s most powerful tool for helping businesses reach the right customers, but it is also where many beginners easily make mistakes and “burn money” simply because they do not understand how it operates.
In this article, BlackHatWorld will guide you step-by-step in the most understandable and practical way through Facebook Ads Manager, from the basic interface and how to create your first campaign to the essential settings that beginners must master. Whether you are a shop owner, a marketer, or someone encountering Facebook Ads for the first time, this guide will help you start confidently and avoid common mistakes right from the beginning.
What New Advertisers need to prepare when starting Facebook Ads
Many new advertisers fail not because of poor ads, but because of incorrect setup from the start. Therefore, before thinking about creating campaigns, setting budgets, or writing ad content, the most important thing we always emphasize to you is setting up a standard Facebook Ads system.
Access Business Manager and create a Business Portfolio
As a first step, please access business.facebook.com and log in with your personal Facebook account. During the login process, Facebook may require two-factor authentication if you have it enabled. If you have not enabled it yet, we will guide you through the setup in a later section, as this is a mandatory step for account security.
After logging in successfully, you will be taken to the Business Manager interface. If this is your first time using it, you likely do not have a Business Portfolio yet. At this point, click on Create Business Portfolio to create a new portfolio.
Business Portfolio can be understood simply as a “master folder” containing all of a business’s advertising assets, including ad accounts, Facebook pages, Instagram accounts, pixels, website domains, and access rights for team members. For example, as we manage advertising for many different clients, each portfolio can contain dozens to hundreds of assets. When creating a new portfolio, you only need to enter the business name, confirm your email, and complete the process. If you do not have a team yet, you can skip the step of adding personnel and return later.
Update Business Information in Business Settings
After having a Business Portfolio, the next step is to go to Business Settings to update business information. This is a step many new advertisers skip, but it directly affects the credibility of the account. In the Business Information section, you need to fill in completely:
- Legal name of the business
- Business address
- Phone number
- Official website
Facebook uses this information to verify that you are a real business, not a fake or spam account. If you do not yet have a business legal entity, such as an LLC or equivalent, we recommend registering early. Currently, this can be completed very quickly at a low cost, but it helps the advertising account become much more stable in the long run.
Set up Security and Two-factor authentication (2FA)
Next, go to the Security Center in Business Settings to turn on two-factor authentication for everyone. This is a mandatory step, not an option.
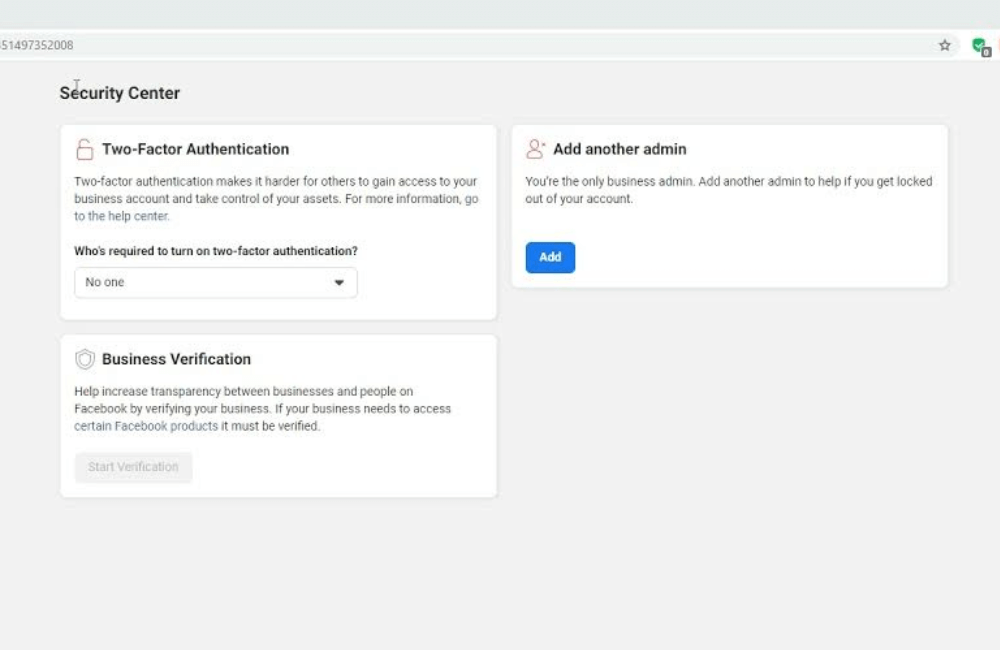
We have encountered many cases where advertisers had their accounts hacked just by accidentally clicking on fake links on Facebook or Instagram. When 2FA is not enabled, hackers can spend tens of thousands of dollars in just a few hours. There are cases of losing 40,000 to 50,000 USD and taking many months to resolve with Meta. Therefore, turn on 2FA for all admins from the start to avoid unnecessary risks.
Add a Trusted Person as a Backup Admin
A very practical tip that we always apply is to add at least one trusted person as an admin in Business Manager. This person can be a relative, partner, or team member.
The reason is simple: if one day your personal Facebook account is locked, restricted, or encounters an issue, there will still be someone else with management rights to maintain the ads. We have seen cases where the main account was suddenly locked, but thanks to the backup admin, the campaign was not interrupted. You just need to go to the People section, click Add, enter the email, and grant admin rights to that person.
Adding assets to Business Portfolio
After completing the security and permission sections, we start adding important assets to the Business Portfolio.
Adding Facebook Pages
Go to Accounts → Pages, click Add, and select Add an existing Facebook Page if you already have a page. Simply enter the page URL and send a confirmation request. If you do not have a page yet, create a new Facebook page. For example, if you are a coach or provide personal services, the page should be built in a personal style to increase trust.
Connecting Instagram with Facebook
Next, link your Instagram account to the Facebook Page at Settings → Linked Accounts → Instagram. Then enable the option to allow receiving Instagram messages in the inbox for convenience in running ads and replying to customers. In Business Manager, go to Instagram Accounts, click Add, and log in to Instagram to grant permissions.
Creating an ad account and adding payment methods
The final step in the preparation is creating an Ad Account. This is where you will create campaigns, manage ads, and budgets. Go to Ad Accounts → Add → Create new ad account, then:
- Name the ad account
- Select the correct time zone from the start
- Select “For my business”
- Add a valid payment method
Note that the time zone and currency cannot be changed after creation, so please check carefully. After this step, you are ready with the foundation. More advanced parts, such as Pixel, Domain Verification, or API Conversions, can be set up after starting to run ads to a website.
Facebook Ad Manager: A Complete Step-by-Step Guide for Beginners
As soon as you access Ads manager, if you look at the top left corner, you will see the Create button. This is the starting point for every advertising campaign. Every time you want to run a new ad, from selling products and collecting leads to increasing messages, you start here.
When clicking Create, Facebook will ask you to choose a campaign objective, such as conversions, messages, or traffic. At the top of the interface, you will see items like Buying Type, Actions, Delivery, and Active Ads. This is the place that helps you track ad status and how Facebook is distributing your budget.

On the right, the Opportunity Score appears as a suggested metric, letting you know the overall optimization level of the account. We consider this a reference metric, not a deciding factor, but it is still useful for knowing the current state of your account.
Customize timeframe and view ad data
An extremely important area that advertisers frequently use is the timeframe selector. Here, you can view ad data by today, yesterday, the last 7 days, 30 days, or a custom range. For example, if you just changed the creative yesterday and want to know the effectiveness, simply select the “Yesterday” timeframe to see it immediately. Filtering the correct time helps you avoid misinterpreting data and makes more accurate decisions.
Account Overview
In the left sidebar, the Account Overview section provides you with a general view of the account. This part is not too detailed, but very useful for quickly grasping the general situation, such as Opportunity Score, spending trends, and overall campaign performance. We often use Account Overview to quickly check the account every day before diving deep into each specific campaign.
Ads Reporting
Next is Ads Reporting, the central place for all your advertising data. Whether you are running one or dozens of campaigns, it contains every key metric that marketers need to track. The strength of ads reporting lies in its report customization capabilities. You can break down data by campaign level, ad set, ad, time, placement, action, or even individual assets within dynamic creatives. For example, you can check which ads are performing best on Instagram Reels compared to Facebook Feed.
Audiences
Audiences are one of the most important parts of Ads Manager. This is where you create and manage your audience segments. With a Custom Audience, you can create files from people who have performed specific actions, such as visiting the website, watching videos, or interacting with the fanpage or Instagram. For example, you can create a segment of everyone who visited the checkout page in the last 30 days to run remarketing ads.
Next is Lookalike Audience, a tool that helps you scale. From a high-quality custom audience, Facebook will find new people with similar behaviors. For example, if you have a list of people who have purchased, a lookalike from this list often brings very good results for expansion campaigns.
Advertising Settings
In Advertising Settings, you will find many important settings such as Account Controls, Value Rules, Advantage Plus Creative, Audience Segments, Data Assets, and Pixels.
If you are a beginner, we recommend taking time to read and get familiar with this area. You will have to return here many times when running long-term ads, especially when optimizing creatives, managing pixels, or assigning account permissions.
Billings and Payments
Billings and Payments is the place to handle all money-related issues. Here, you can view your Current Balance to know how much debt you owe.
You can also set a payment threshold, for example, Facebook will charge you every time spending reaches 100 dollars or 1,000 dollars. This helps you be more proactive in controlling cash flow. Additionally, you can add, remove payment methods, or top up manually instead of letting Facebook automatically charge your card. The Payment Activity section saves all your invoices and transaction history, which is very useful when needing to reconcile costs.
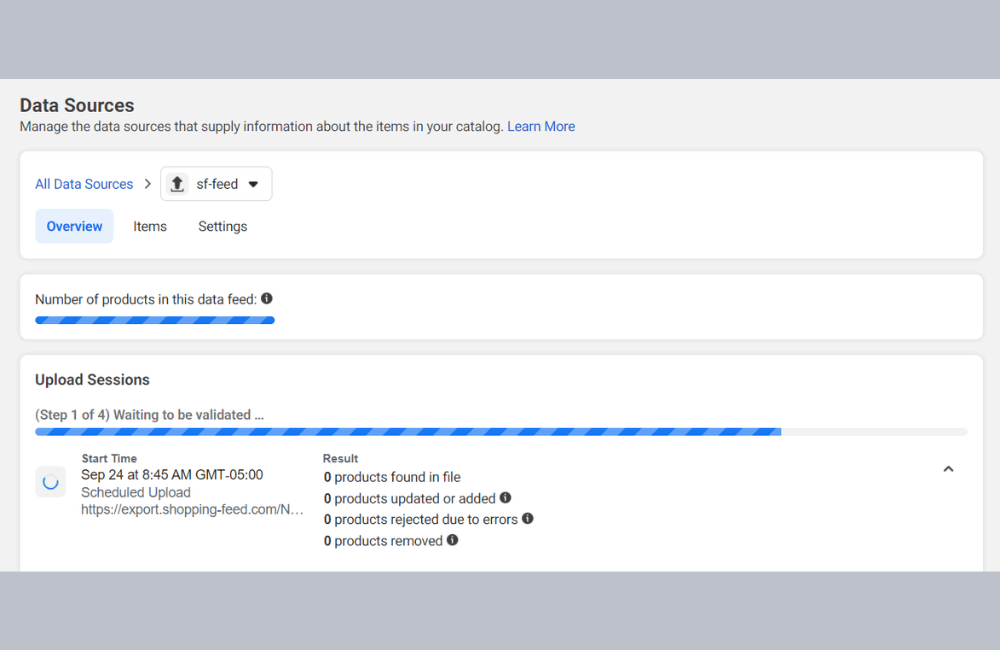
Events Manager –Pixel
Events Manager is where you set up pixels and track conversion events. If you run conversion ads without a pixel or without properly setting up events, effectiveness will be very poor.
In Data Sources, you will see pixels, Custom Conversions, and partner integrations. For example, you can create a Custom Conversion to track a specific action, such as clicking a register button or completing a form that Facebook does not automatically recognize. Additionally, Partner Integrations allow you to connect with Conversions API through platforms like Shopify, helping send data from the server and improving accuracy after iOS updates.
All Tools and Business Settings
This is where many advanced tools are gathered. In Business Settings, you can manage users, assign permissions, add fanpages, ad accounts, Instagram accounts, WhatsApp accounts, and other assets.
The Data Sources section allows for managing catalogs, pixels, offline events, and shared audiences. Domain verification is also located here, helping Facebook confirm your website is safe and reliable. This is the area that professional advertisers use very frequently to manage the entire advertising ecosystem methodically and for the long term.
Facebook Ads Manager is the core tool that any advertiser needs to master if they want to run ads effectively and sustainably. When you clearly understand each area, from creating campaigns, managing audiences, tracking data to payments and pixels, you will be more proactive in every decision and avoid many costly mistakes. For beginners, spend time getting familiar step by step, as this is the foundation for long-term ad optimization.
Frequently asked questions
Not necessarily. You only need to master the basic parts, such as creating campaigns, choosing objectives, tracking results, and making payments. Advanced features can be learned gradually during the ad running process.
You can, but you should not. Pixel helps Facebook optimize distribution, measure conversions more accurately, and create high-quality audience sets, which is especially important if you want to run ads effectively in the long run.
💬 Contact now for free consultation from BHW!
- Website: https://vi.blackhatworld.io/
- Telegram: @bhw_agency
- Whatsapp: +84819001811
- Wechat: bhwagency
- Email: [email protected]
This article is also available in other languages: