How to Run Political Ads on Facebook: The 5-Step Authorization Checklist (2026)
Facebook is currently one of the most effective platforms for political ad campaigns. Unlike many other social networks, Facebook has an older user base, which is exactly the demographic most likely to vote in elections. This helps political campaigners reach the right group of potential voters and convey their message more accurately.
Particularly for campaigns at the local level, Facebook advertising also brings a huge advantage: you can connect directly with people you know in the area, building personal relationships and trust. As a result, sending messages, providing yard signs for campaigns, or even mobilizing volunteers to go door-to-door becomes easier. In this article, BlackHatWorld will guide you in detail on how to set up and optimize electoral or political ads on Facebook, helping your campaign achieve the highest efficiency.
5 Steps for Facebook to grant authorization for political ad campaigns
Here, we will guide advertisers who are preparing to run electoral campaigns through the 5-step standard process for Facebook to approve authorization for running political ads or ads about social issues. This is a mandatory step if you want to ensure your campaign complies with Meta’s transparency policies and is legally displayed publicly.
Step 1: Log in to your account and access the authorization section
First, you must log in to your personal Facebook account. Then, go to the Page you want to run ads for.
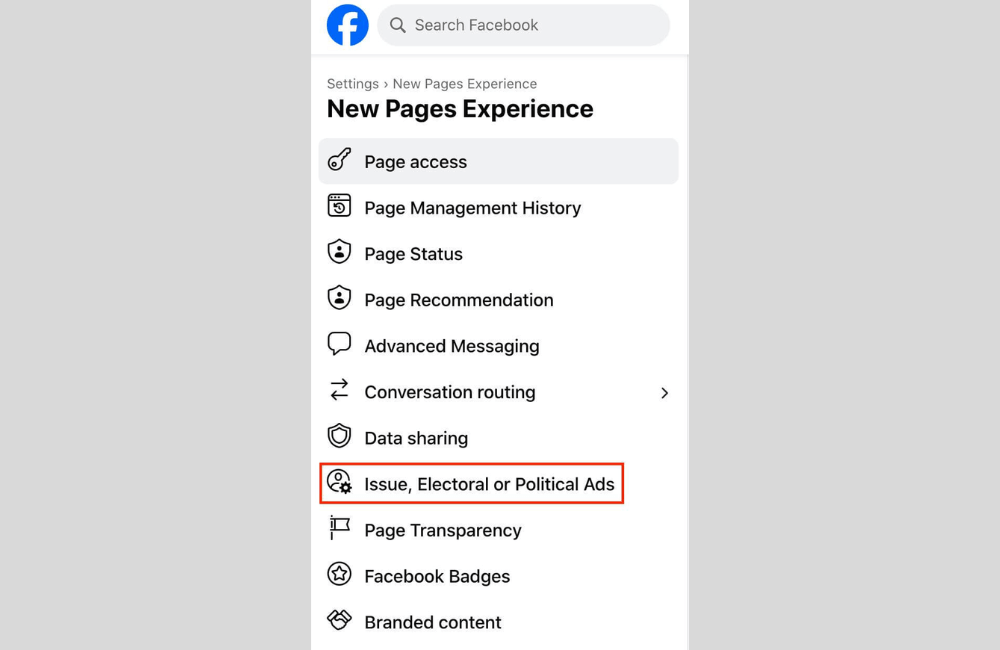
On the page interface, go to the Professional Dashboard, then look at the left menu, scroll down, and select Page Access.
In this section, you will see the option “Issue, Electoral or Political Ads”; click on it to begin the authorization process.
Step 2: Select the country and prepare the necessary documents
Next, Facebook will require you to select the country where you currently live or conduct political activity, such as Australia, the United States, or Canada.
After selecting, the system will display the section “What you’ll need to do,” which includes:
- Verify identity: This is a mandatory step to prove that you are a real person, not an anonymous or fake organization.
- Create a Disclaimer: This section helps viewers clearly know who your ad represents, for example: “Paid for by the Sydney Green Election Support Group 2025.”
- Link the ad account to the disclaimer: You need to link your primary ad account to the disclaimer section for Facebook to approve it simultaneously.
- Optional: In this section, if you want the ad to appear on Instagram, don’t forget to link your Instagram account as well.
Step 3: Start verifying personal identity
After completing the country section, scroll down and select Confirm Your Identity, then click Get Started.
Note that Facebook only allows identity verification using a personal profile, not a page.
When switching to the personal profile, you will be asked for the reason for verification. Select: “Running ads about social issues, elections, or politics”.
For example, if you are living in Canberra or Sydney (Australia), select the corresponding country and click Continue to confirm starting the verification process.
Step 4: Submit verification information and documents
Facebook will require you to complete three important items:
- Enter your Mailing Address (e.g., Canberra, ACT 2600, Australia).
- Upload an ID such as a passport, national ID card, driver’s license, or voter ID card.
- Provide an identification number (In Australia, this could be a Medicare number or an Australian passport number).
Once completed, click Submit.

You can choose to upload documents via the Facebook app on your phone or select photos from your computer.
If you are genuinely running a campaign for an organization or a candidate, ensure the documents are valid, clear, and match the information displayed on Facebook so that the review process happens quickly.
Step 5: Create the disclaimer and authorize the ad account
After Facebook successfully verifies your identity, you will see a green checkmark (✔) displayed in the account section.
At this point, proceed to create the Disclaimer, clearly stating the name of the organization or individual funding the ad.
Example: “Paid for by the Canberra Green Policy Reform Group.”
Once this section is complete, Authorize the Ad Account by selecting the account you want to use and clicking Submit for Facebook to activate the political advertising rights for you. If you have completed all the steps above but the ad is still not authorized, please contact BlackHatWorld immediately to rent an ad account for your election campaign on Facebook!
BHW Agency is an official Facebook partner with over 11 years of practical experience in hundreds of multi-industry and multi-market projects. We own a system of high-quality Agency accounts, operating across various time zones, currencies, and countries, run within specialized Proxy/VPS with stable IPs, ensuring absolute efficiency and safety for every campaign.
Our Facebook ads specialist team provides comprehensive consulting and technical support services, from setting up campaigns, creating ad content, defining the target audience, installing pixel and measuring tools, to optimizing ad performance.
How to Run Political Ads on Facebook
Before starting, we want to emphasize that running political ads on Facebook is not simply about clicking the “Boost post” button and waiting for results. It is a process that requires an understanding of the display algorithm, the target audience, and Facebook’s specific regulations for election-related content. Let’s go through the process from creating the ad, selecting the audience, optimizing the budget, to the approval stage, illustrated with real examples for easy, immediate application.
Starting the Ad Campaign
To begin, click “Boost Post.” Immediately after, Facebook will take us to the ad setup interface. In the first step, select the correct Ad Account that you will be using. Then, in the Goal section, we usually leave it in Automatic mode, as Facebook currently uses a very smart algorithm to display ads to the right group of people who are likely to be interested and engage.
If you wish to customize, you can click “Change” to view more specific objectives, but for political ads, leaving it on Automatic usually yields the most optimal results for the budget.
Adding a Call to Action Button
The next step is to add a call to action (CTA) button. We recommend choosing “Learn More.” When viewing the ad preview, you will see this button located right below the video or image. This is where viewers can be redirected to the candidate’s website, for instance, Christy’s campaign page helping them learn more about your platform and vision.
Setting up the Special Ad Category
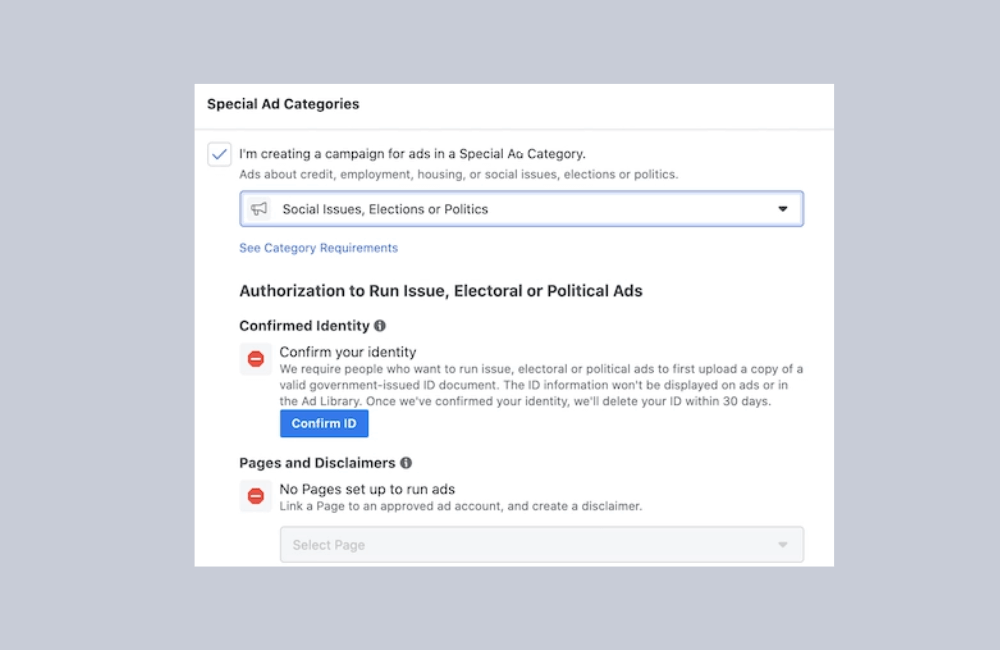
This is a very important part that many advertisers often overlook. If you set it up incorrectly, Facebook will reject the ad, and you might lose up to 24 hours waiting for re-approval. In this category section, Facebook will ask: “Is your ad related to credit, employment, housing, social issues, elections, or politics?”
Since this is a political ad, we will choose “yes,” then select “Elections or Politics.”
If your Instagram account is not connected, Facebook will display an error message, “Instagram account not authorized.” In this case, you can uncheck Instagram to only run ads on Facebook and Messenger, as Messenger is still enabled by default.
Identifying the Target Audience
This section directly determines the effectiveness of the campaign. If you target a group of people unlikely to vote for you, you are wasting your ad money.
Instead of using Smart Audience (automatic), select Create New Audience to create your own audience group. Give it an easy-to-remember name, for example, “Audience 1”.
- Gender: Select “all”.
- Age: We recommend selecting ages 35 and up, as this group has the highest voter turnout rate.
Defining the Electoral Constituency
By default, Facebook will display “United States”. Delete it and enter the name of the city where you are running for election, for example, “Canberra” or “Queanbeyan” – areas near the Australian capital.
You will see a blue circle representing the ad reach. The default is 25 miles, but we recommend reducing it to 10 miles or lower to focus on the exact voter area.
You can also Drop Pin on key areas, for example, around Parliament House or Canberra city center, to ensure the ad covers your specific electoral constituency.
Detailed Targeting
Here, you can instruct Facebook to only display ads to people with interests related to the campaign topic. Previously, it was possible to select based on political affiliation, but Facebook has now removed this option.
For example, if you are running for the Local Education Board, select interests such as “Education,” “Parents,” “Local Government,” or “Community Issues.”
Once complete, Facebook will display the Audience Definition, which helps you see the reach and relevance of the target audience.
Setup Budget & Duration
Next is selecting the ad run duration. We usually start with 7 days to test the response. If there are no interactions or clicks after a few days, you can pause and re-optimize the content.
For example, a budget of 500 USD for 7 days can reach from 1,200 to 3,500 people, depending on content quality and local competition level.
Completing and monitoring the ad
When you are ready, check the entire Preview section again, ensuring all elements are accurate. Then, click Boost Post Now to submit the ad for Facebook review.
The review time is usually about 24 hours, and you can track the progress in the Ad Center. If the ad shows the status “In Review,” it means it is pending approval; once approved, Facebook will tag it with a green “Active” status, and your campaign officially begins to attract voters.
Running political ads on Facebook requires not only accuracy in every authorization step but also transparency and strict adherence to the platform’s regulations. By following the correct procedure, you can fully leverage the power of Facebook to disseminate your message, connect with voters, and build credibility for your campaign. Ensure all advertising activities are legally verified; that is the foundation for a sustainable and effective political communication campaign in 2026.
Frequently asked questions
Facebook requires verification to ensure transparency, prevent anonymous advertising activities, and prevent falsely influencing elections. This helps increase your campaign’s credibility and ensures faster ad approval.
Yes. Once you have completed the authorization process and verified the political category, your ads can be shown not only on Facebook but also on Instagram and Messenger – helping to maximize voter reach.
💬 Contact now for free consultation from BHW!
- Website: https://vi.blackhatworld.io/
- Telegram: @bhw_agency
- Whatsapp: +84819001811
- Wechat: bhwagency
- Email: [email protected]
This article is also available in other languages: