How to Track Purchases on Facebook Ads Accurately (The 2025 Pixel & CAPI Guide)
If you are running Facebook ads for your Shopify store but haven’t correctly set up the Facebook pixel, there is a high chance you are wasting your ad budget every day without knowing it.
Besides paid ad spy tools, Facebook also provides two highly effective tools: the Facebook pixel and CAPI (conversions API). These are extremely important tools that help track the entire user behavior on your Shopify store from when they click the ad, view the product, add it to the cart, initiate checkout, and complete the order. All this data is sent back to Facebook, helping the system optimize the ad delivery algorithm, display ads to the right potential customers, and enhance the conversion rate.
If you do not know how to set up or are having difficulties configuring the pixel, BlackHatWorld will guide you in detail on how to track orders and measure Facebook ad effectiveness to help you grow your revenue!
The difference between Pixel and Conversions API (CAPI)
When it comes to tracking and measuring Facebook ad performance, Pixel and Conversions API (CAPI) are two familiar tools that advertisers often hear about. However, many still confuse how they work and the difference between them. Let us analyze them more clearly so you can understand how to utilize both for the best ad campaign optimization.
Facebook Pixel
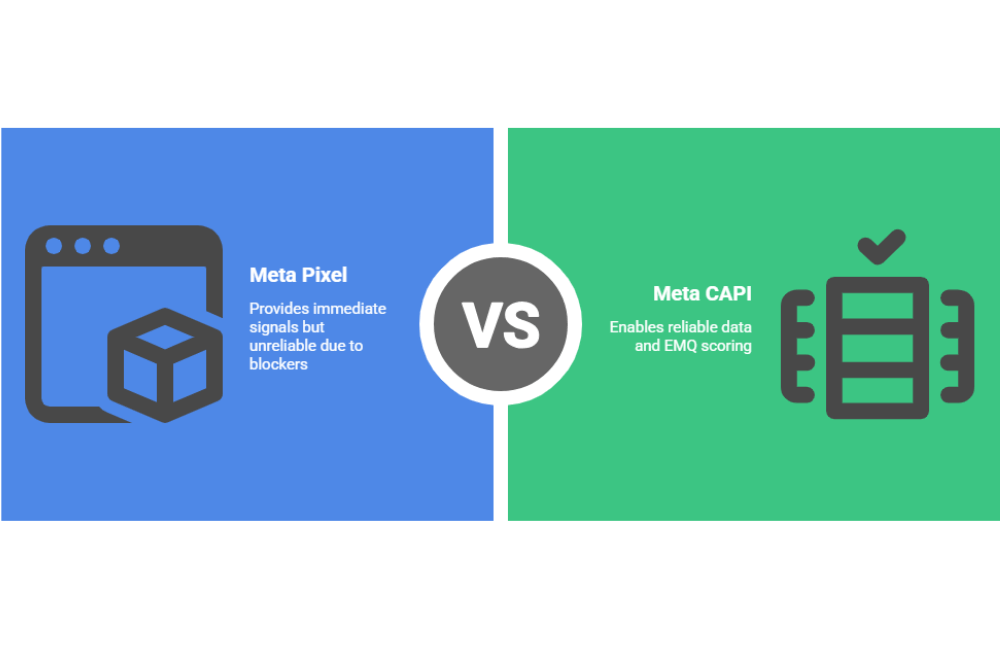
The Facebook Pixel acts as a “direct line” between your website and Facebook. Every time a user takes an action on the website, such as viewing a product, adding it to the cart, or completing an order, the Pixel sends that data directly from the user’s browser to Facebook’s server.
For instance, when a customer visits your online store to look at athletic shoes, the Pixel automatically records this action and helps Facebook understand that this user is interested in that item. As a result, Facebook can optimize your ads to show them again to people with similar behavior, helping to increase the conversion rate.
However, the limitation of the Pixel is its reliance on the browser. When users enable cookie blocking, use incognito mode, or have a weak network connection, data may be lost or not fully sent back to Facebook.
Conversions API (CAPI)
Meanwhile, Conversions API (CAPI) operates through a more modern and stable process. When a user clicks on your ad, they are redirected to the landing page. Here, if they act, such as submitting their email to download a free document (lead magnet), this information is saved on your server or CRM system.
Instead of sending data through the browser, CAPI sends this event directly from your server to Facebook, helping to minimize data loss and ensuring metrics are recorded more accurately.
For example, if you are using HubSpot or Shopify, when a customer fills out a contact form, the CRM system automatically transfers that information to Facebook via API, even if the user has disabled cookies or left the page early.
How to Track Purchases on Facebook Ads Accurately with Pixel
When running e-commerce store ads on Facebook, correctly setting up Pixel and CAPI (Conversions API) is extremely important for accurately tracking the customer journey on Shopify. Below, we will guide you step-by-step on how to install and test the Facebook Pixel to ensure your ad data runs smoothly and delivers the highest efficiency.
Setting Up the Facebook Pixel in Shopify
We will start from the Shopify admin interface. Shopify operates based on apps and sales channels, of which Facebook is one of the most important channels. The steps are as follows:
- Go to apps → add app → all recommended apps. This action will open the Shopify app store.
- Next, select Find apps in the Shopify app store.
- In the search bar, type “Facebook,” then choose Facebook & Instagram. This is the official app developed by Meta.
For those who are just starting, we recommend using this official app because it is easy to install, automatically connects to your Facebook account, and operates stably.
After that, select Install, and the system will ask you to add the Facebook sales channel. Just click Get Started to begin.
Connecting your Facebook Account
Next, you need to connect your Facebook account. Ensure that the account is already linked to the Business Manager you are using to run ads. At this step, Facebook will ask you what type of data you want to send back to their system. You can choose the appropriate level of data sharing:
- Conservative: Only sends basic data such as page views, added to cart, initiated checkout, and purchases.
- Enhanced: Sends additional information like customer name and email.
- Maximum: Includes name, email, phone number, and address, helping Facebook optimize for lookalike audiences more effectively.
Tip for Advertisers: If you are selling in countries with strict data regulations (like Europe), make sure the privacy policy on your website matches the level of data sharing you select.
After making your selection, click Save to confirm.
Create a Facebook Pixel
Now, we will create a pixel to track user behavior.
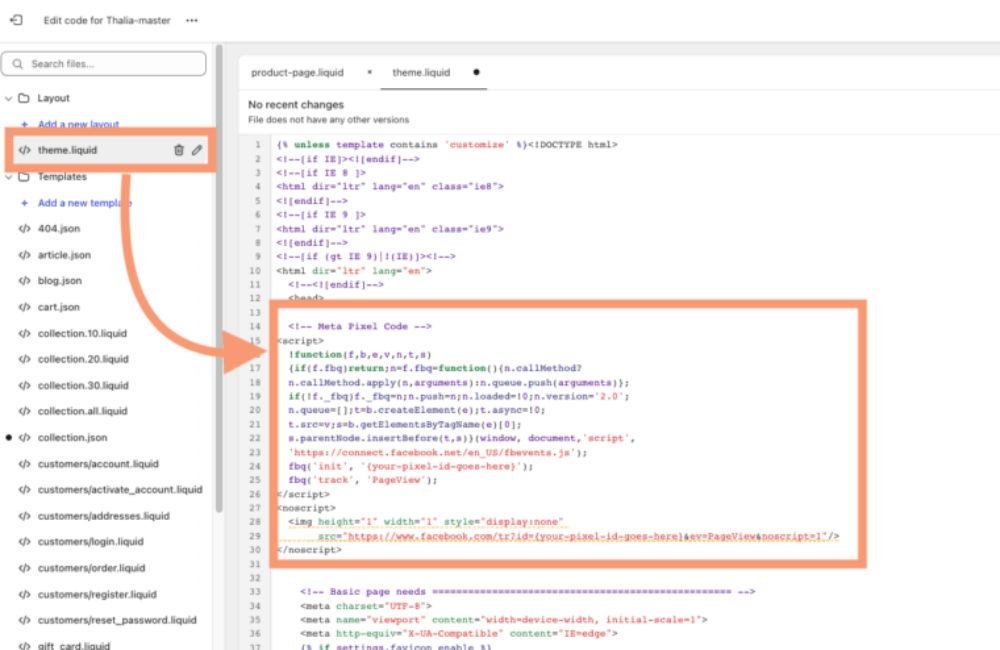
- Select create Meta Pixel, name the Pixel (e.g., “shopabc_pixel”), then click Confirm → Agree to the terms → Submit for review.
- Facebook will automatically insert the tracking code into your Shopify store.
Every time a customer views a product, adds it to the cart, checks out, or completes an order, the pixel will record and send that data back to Facebook.
Example: If a customer purchases a product worth 1,000,000 VND, Facebook will record this value. This allows you to calculate the ROAS (return on ad spend).
After completing, click Done to finish this step.
Connecting products with Facebook & Instagram
After installing the Pixel, you will see a notification that products in your store can be synchronized to Facebook and Instagram. This allows you to:
- Create carousel ads,
- Tag products in posts,
- Or run Dynamic ads that automatically show the exact products a user has viewed.
For example, if you sell fashion, enabling this channel will help Facebook automatically show the dress or shirt product you are advertising to people with similar interests.
Check Pixel activity
To ensure the Pixel is recording data correctly, do the following:
- Go to Facebook business manager → Data Sources → Pixels.
- Check if the Pixel ID in Shopify matches the Pixel in Facebook (e.g., the ID ends in 5295).
- Open Events Manager to see if the events are active.
If the Pixel is not yet recording data, return to the store and simulate a few real actions, such as:
- Viewing a product,
- Adding to cart,
- Proceeding to checkout.
Afterward, go back to Events Manager → Test Events to check if these actions have been recorded.
If you see the data displayed, it means the Pixel is working correctly and is ready to help you track orders, optimize ads, and increase the conversion rate.
A guide to setting up Conversions API with Zapier
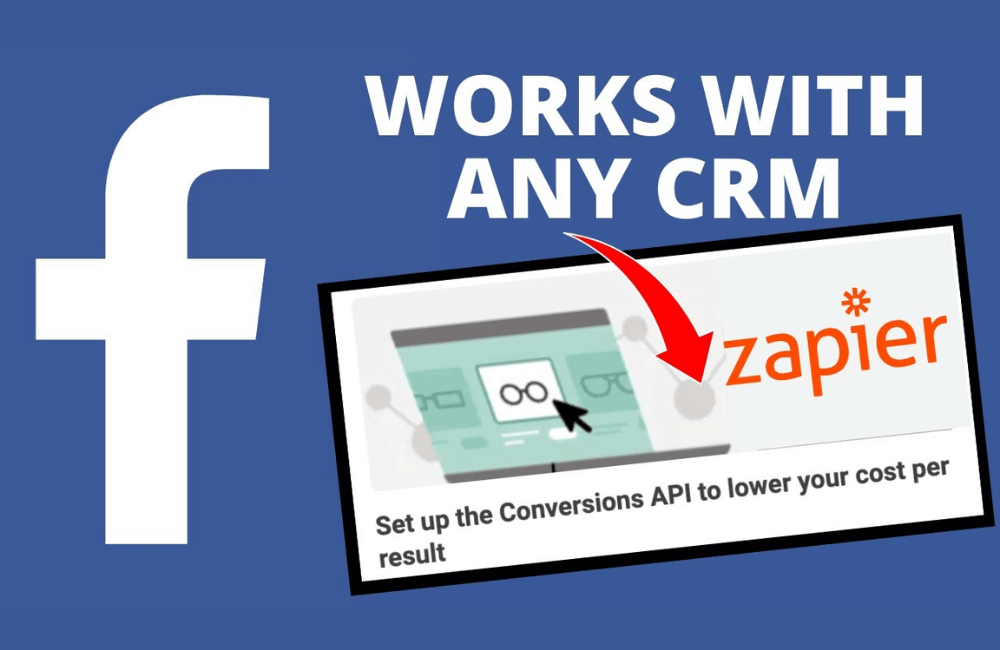
This method is extremely useful when you want to send conversion data back to Facebook without manual operations or complex technical knowledge.
Step 1: Go to Zapier and create a new Zap
First, log in to Zapier and create a new Zap. A Zap is an automation chain that allows you to connect two platforms, such as Unbounce and Facebook, to automatically transmit data.
Step 2: Identify the event triggering application (Trigger App)
In this step, we select Unbounce – a popular platform that helps create landing pages to collect customer information.
- In the Event section, select “New Form Submission”, meaning that every time someone fills out the form on Unbounce, the system will automatically trigger the action of sending data back to Facebook.
- Click Continue, select your Unbounce account, and then choose the correct landing page you are using.
- Finally, test the connection to ensure that Zapier can access the data from Unbounce.
Example: If you are running an ad inviting clients to sign up for a legal service consultation, every time someone fills out the registration form, Zapier will register this action as a “Lead.”
Step 3: Set up an Action on Facebook
In the Action section, select the “Facebook Conversions” app.
- Choose the Facebook account you want to send data to.
- Next, select the Business Account, Pixel ID, and relevant data fields to connect the correct source.
Step 4: Submit detailed data for increased accuracy
Facebook always performs better when it receives more accurate user data. Therefore, if possible, include the following information:
- Phone number
- Full name
- City, country, and ZIP code
This data helps Facebook accurately identify user identities, thereby optimizing ads and increasing the accuracy of conversion reporting.
Step 5: Check and complete
After entering all the information, click continue, then choose Test to try it out, or Skip Test if you want to bypass the verification step.
From now on, every time a client fills out the form on Unbounce, Zapier will automatically send a “Lead” event back to Meta to report the conversion. This helps you accurately measure campaign effectiveness and allows the Facebook algorithm to optimize the target audience, thereby reducing advertising costs and increasing the actual conversion rate.
Accurately tracking orders on Facebook ads by setting up Pixel and CAPI is a crucial step that helps advertisers, especially Shopify store owners, understand the customer journey and optimize campaign efficiency. When data is accurately collected and sent back to Meta, the advertising algorithm will learn faster, deliver better, and help you optimize ad costs per order.
Frequently asked questions
Yes. Pixel and CAPI work in parallel to ensure the most complete data collection. While Pixel tracks events through the browser, CAPI sends data directly from the server, which helps limit data loss due to cookie blocking or browser errors.
You can check in Meta’s Events Manager. Here, you will see events being sent from both Pixel and CAPI. If the events show “active” and have a green checkmark, it means the data is being transmitted accurately and synchronously.
💬 Contact now for free consultation from BHW!
- Website: https://vi.blackhatworld.io/
- Telegram: @bhw_agency
- Whatsapp: +84819001811
- Wechat: bhwagency
- Email: [email protected]
This article is also available in other languages: