How to Pay for Your Meta Ads (Guide for newbie)

If you are new to Meta ads, the payment setup section is probably one of the most confusing things. Many people mistakenly think they need to pre-load money like a prepaid wallet, but in reality, Meta mainly operates on a post-paid basis. This means you will pay after your ads have run, based on the spending limit provided. Besides that, many advertisers worry about unexpected charges or uncontrolled spending. However, you can rest assured because, in this article, BlackHatWorld will give a detailed guide on everything from setting up payment methods to the ad payment process on Meta, helping you be more proactive and manage your budget effectively.
Why is it necessary to pay for Meta ads correctly?
When you run ads on Meta (including Facebook and Instagram), it means you are paying for your ad’s display position. If a valid payment method is not set up, Meta will not allow the campaign to run. Therefore, understanding and making payments correctly not only helps the ad run smoothly but also avoids the risk of interruption in the customer acquisition process.
Two main payment methods on Meta Ads
You should know that Meta currently offers two popular payment methods:
- Post-paid: This is the method many advertisers use. For example, you set a spending limit of 500,000 VND. When the ad runs and reaches that amount, Meta will automatically deduct money from the saved payment method.
- Prepaid: With this method, you add a certain amount of money to the account in advance. The ad will run until the balance runs out. For instance, if you top up 1,000,000 VND, the ad will stop as soon as the spending reaches this balance.
The payment settings section in Meta ads
To set up or check payments, you need to clearly identify the type of ad account you are using:
- Personal ad account: This type is directly linked to a personal Facebook account. For example, if you only run ads for your small shop, this is the type of account commonly used. Payment methods will be saved directly in the account settings.
- Business ad account: If you are an agency or manage multiple fanpages, this account will be administered through Meta Business Suite. Within it, you will find Business Manager, where you can manage multiple business ad accounts at once.
How to Pay for Your Meta Ads (Guide for newbie)
To make it easier for you, we will share a detailed guide on how to make payments in both personal and business ad accounts, with practical examples for advertisers to visualize more clearly.
Payments in a personal Meta ad account
When you run ads with a personal account, payment is quite simple and intuitive.
Step 1: Log in to Facebook and open your personal Ads Manager.
Step 2: Go to the Billing and Payments section on the left-hand menu. This is where you manage all your ad transactions.
Step 3: Add tax information if you want to generate tax invoices for your business.
Step 4: Top up your account. Meta allows you to pre-fund, with a minimum of 0.5 USD and a maximum of 1 USD. You can top up about 5 USD to test your ads.
Step 5: Choose a payment method: debit/credit card, UPI, or online banking. If you use a Visa/MasterCard, the system will automatically deduct fees as the ads spend money.
Step 6: Add business information: name, address, country, currency, GST/PAN number (if needed).
Payment in business ad account
For freelancers, agency owners, or companies, making payments within Meta Business Suite makes management easier, especially when handling multiple clients or campaigns at once.
Step 1: Log in to Meta Business Suite.
Step 2: After logging into Facebook, select Business Manager within Meta Business Suite.
Step 3: Create or select a business ad account. If you do not have one, you can create a new one to manage campaigns more professionally.
Step 4: Go to the Billing & Payments section. Here, we will see two payment levels:
- Ad account level: Each account has its own payment method.
- Business manager level: A common payment method that can be shared with multiple sub-accounts.
For example, If you are a freelancer running ads for three different clients, you should add a payment method at the ad account level so that each client can control their own budget.
Step 5: Add a payment method.
Step 6: Choose a credit/debit card, PayPal, or online banking, then save it.
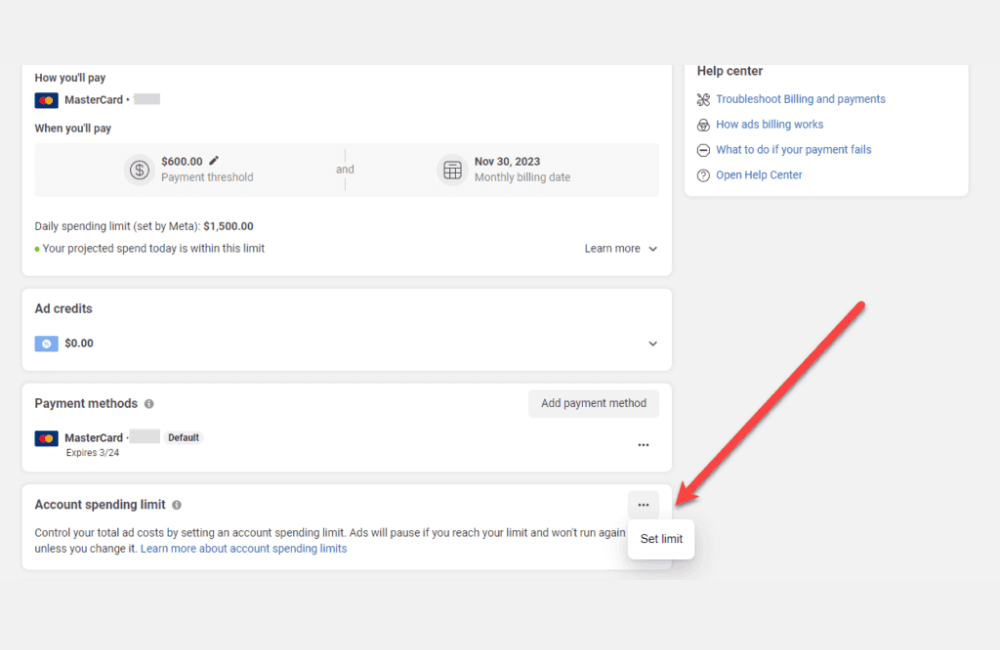
Step 7: You can set a spending limit for each account to avoid the risk of exceeding the budget.
A guide to paying for Meta ads with a Prepaid Fund.
When running ads on Meta, many of you will want to proactively control your budget by pre-loading funds into your account rather than using a post-pay system. This is when the transfer feature in the prepaid fund becomes effective. Previously, Meta removed this feature, but it has now been restored, helping advertisers easily deposit funds and manage spending more transparently. Here, we will guide you through the specific steps to do this.
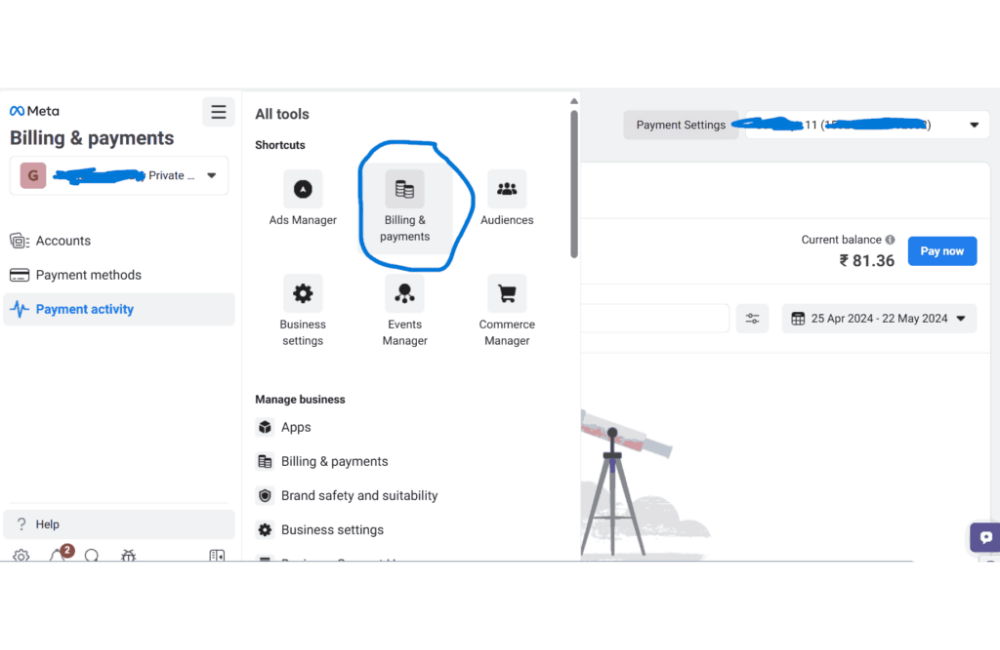
Step 1: Access Meta Business Suite.
Log in to business.facebook.com. On the main interface, select All Tools → Billing & Payments. This is where we will perform the top-up operations.
Step 2: Choose a top-up method
In the Billing & Payments section, you will see the Add Funds option. Click on it, then enter the amount you want to top up, for example, 50 USD. Next, Meta will display the payment methods:
- Debit/Credit Card
- Bank Transfer
- MasterCard
Choose Bank Transfer, then click next to continue.
Step 3: Confirm transaction information
The system will ask you to enter your phone number. You can enter any number, as it does not affect the transaction. Then click continue. Immediately, Meta will provide a virtual account for you to make the transfer. Important notes:
- This is a one-time-use virtual account. Each time you top up, Meta will provide you with a new account number.
- The beneficiary bank will be shown as Paga.
- You must transfer the exact amount you entered, for example, 50 USD, for the system to automatically confirm the transaction.
Step 4: Complete and check the balance
After a successful transfer, the funds will be added to the Billing & Payments section of your ad account in just a few minutes. You can use it immediately to run a new campaign or continue distributing an existing one.
In addition to a computer, you can also complete this entire process on your phone. Just go to the Meta Business Suite app and follow the same steps; it’s very convenient and fast.
With this prepaid funding method, advertisers can tightly control costs, limit unexpected risks, and ensure campaigns always run smoothly without worrying about interruptions due to payment issues.
Methods to fix being rejected by Meta Ad payments.
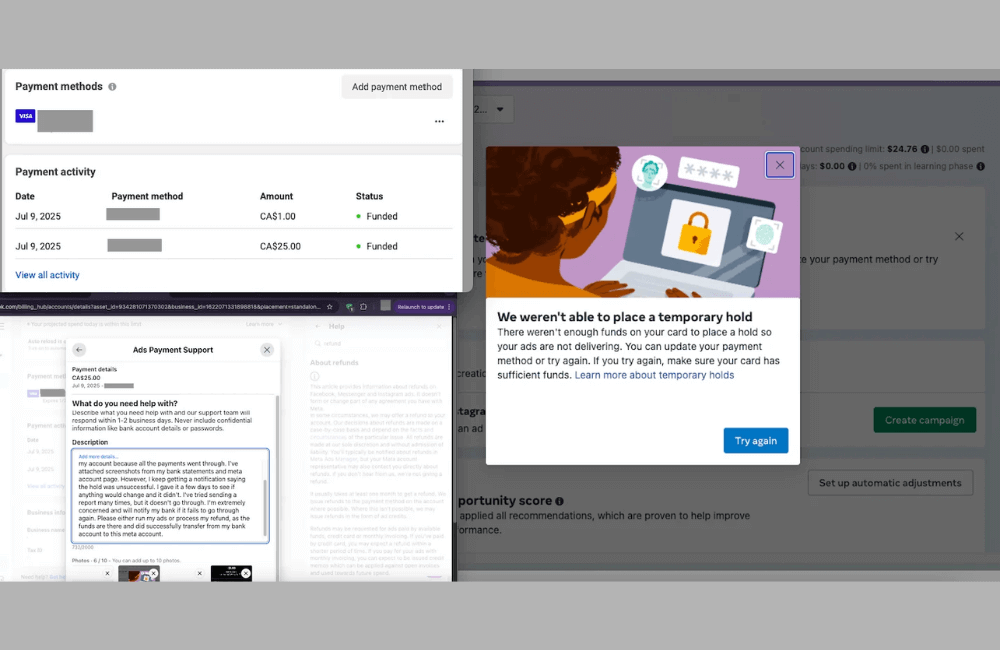
During the process of running ads, many of you or advertisers must have encountered a situation where the system reports a payment error. Sometimes, the error happens right from the first step when we add a payment method, and the card is rejected. Or there are also cases where the card has been accepted and the ads are running normally, but then the account is disabled with the message: “The ad account has been disabled because Facebook could not charge the card.” Below, we will share 3 common methods you can apply to handle this issue.
Method 1: Using a Providus Bank card
One of the effective solutions is to register for a card from Providus Bank. This bank offers two popular card types:
- Platinum Mastercard: The issuance fee is about 5 USD, with a maximum transaction limit of 3,000 USD/month.
- Classic Mastercard: The issuance fee is about 1 USD, with a maximum transaction limit of 1,200 USD/month.
You just need to go to the nearest Providus Bank branch, request to open a card, deposit money, and then add the card information to your Meta ad account. With this card, you can pay off any outstanding debts and continue running ads without worrying about interruptions.
Method 2: Create a Prepaid Ads Account.
If you do not want to open a Providus card, another option is to create a prepaid ads account. This method is especially suitable for those who want to control their spending strictly. The steps are as follows:
- Go to business settings in Business Manager/Business Portfolio.
- Select Create a new ad account, name it, choose the time zone (for example: GMT+1 – Africa/Lagos), and the currency as USD.
- Confirm the account is for your business.
- Add a payment method via PayU (supports Visa/Mastercard).
- Preload an amount into the ads account.
The strength of this method is that you will not have to worry about unexpected charges because the system only deducts directly from the preloaded balance.
Method 3: Renting an ad account from an Agency
If both of the above options are time-consuming or unsuitable, the fastest way is to rent ad account from a reputable agency. This is a solution chosen by many advertisers, especially those with large budgets. If you need a reputable ad account and a team to support effective campaign scaling, please contact BHW via Telegram: @bhw_agency
For over a decade, BlackHatWorld has accompanied thousands of businesses, successfully implementing hundreds of advertising campaigns, and achieving impressive revenue numbers. We are proud to be a reliable provider of Facebook ad accounts for rent, trusted and chosen by many advertisers.
All accounts at BHW are operated in a specialized Proxy/VPS system, using clean and reputable IPs, which helps minimize checkpoints, flags, or disablements. In addition, we provide a full range of BM2500, BM5000, and verified Invoice accounts, allowing you to run ads with a large budget. This is the advantage that helps advertisers easily scale their campaigns strongly and sustainably.
Meta ad payments can feel complicated for many beginners. With the detailed instructions in this article, we believe you can confidently set up and manage ad costs effectively, avoiding risks and optimizing your budget. The most important thing is to regularly check the Billing & Payment section to ensure your campaigns are not interrupted.
Frequently asked questions
Yes. You can add multiple payment methods and set one as default. If the main card has an issue, you just need to switch to a backup card so your ads are not interrupted.
No. Meta usually applies a post-payment mechanism. This means you will run the ads first, and then Meta will deduct the money based on the spending limit or on the scheduled billing date. However, if you use a prepaid account, you will need to deposit money before running ads.
💬 Contact now for free consultation from BHW!
- Website: https://vi.blackhatworld.io/
- Telegram: @bhw_agency
- Whatsapp: +84819001811
- Wechat: bhwagency
- Email: [email protected]
This article is also available in other languages: